In this section, you will learn to create Gauges in JavaFX application. There is library ‘Medusa Gauges’ that has all useful classes ready to create and use Different types of Gauges in JavaFX application. Now we will look into it and will explore it step by step from the beginning.

Step 1: First download a jar file “Medusa.jar” from the given link below.
https://bintray.com/hansolo/Medusa/download_file?file_path=eu%2Fhansolo%2FMedusa%2F8.0%2FMedusa-8.0.jar
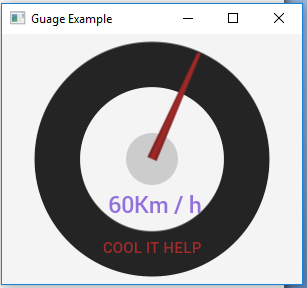
The image given below is showing the Gauge with style.
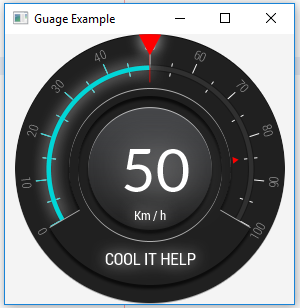
First, we will create a gauge as shown above then we will do more styling with gauge. Here are the steps.
Step 1: First download a jar file “Medusa.jar” from the given link below.
https://bintray.com/hansolo/Medusa/download_file?file_path=eu%2Fhansolo%2FMedusa%2F8.0%2FMedusa-8.0.jar
Step 2: Now add the downloaded jar to your project classpath.
Step 3: Now copy and paste the following code in java file inside the start method.
public void start(Stage primaryStage) {
Gauge gauge = new Gauge();
Button btn = new Button();
btn.setText(“Click Me'”);
btn.setTranslateX(10);
btn.setTranslateY(200);
//button click action handler – To change the needle position dynamically
btn.setOnAction(new EventHandler<ActionEvent>() {
@Override
public void handle(ActionEvent event) {
System.out.println(“Hello World!”);
gauge.setAnimated(true);
gauge.setValue(90.00);
}
});
gauge.setSkin(new ModernSkin(gauge)); //ModernSkin : you guys can change the skin
gauge.setTitle(“COOL IT HELP”); //title
gauge.setUnit(“Km / h”); //unit
gauge.setUnitColor(Color.WHITE);
gauge.setDecimals(0);
gauge.setValue(50.00); //deafult position of needle on gauage
gauge.setAnimated(true);
//gauge.setAnimationDuration(500);
gauge.setValueColor(Color.WHITE);
gauge.setTitleColor(Color.WHITE);
gauge.setSubTitleColor(Color.WHITE);
gauge.setBarColor(Color.rgb(0, 214, 215));
gauge.setNeedleColor(Color.RED);
gauge.setThresholdColor(Color.RED); //color will become red if it crosses threshold value
gauge.setThreshold(85);
gauge.setThresholdVisible(true);
gauge.setTickLabelColor(Color.rgb(151, 151, 151));
gauge.setTickMarkColor(Color.WHITE);
gauge.setTickLabelOrientation(TickLabelOrientation.ORTHOGONAL);
StackPane root = new StackPane();
root.getChildren().addAll(gauge);
root.getChildren().addAll(btn);
Scene scene = new Scene(root, 300, 250);
primaryStage.setTitle(“Guage Example”);
primaryStage.setScene(scene);
primaryStage.show();
}
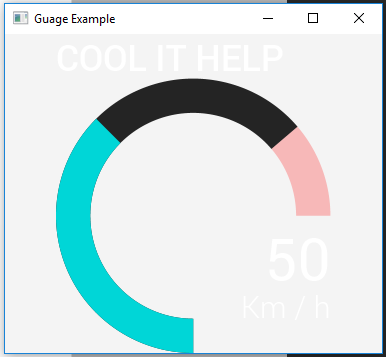
Now do a clean build and run this file. You will see radial Gauge on stage.
**How to set medusa gauge skin?
If you want to change the skin of Gauge the use the following code:
1) gauge.setSkin(new SpaceXSkin (gauge));
2) To use AmpSkin
gauge.setSkin(new AmpSkin(gauge));

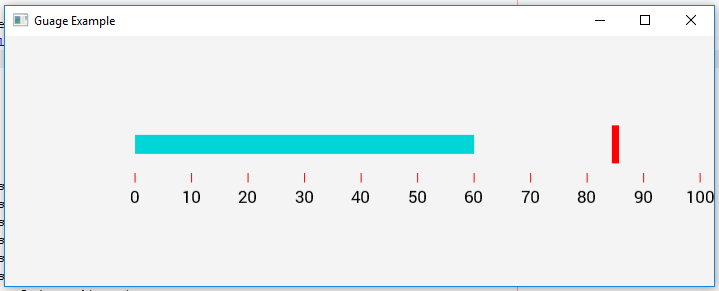
3) To use Bar Skin
gauge.setSkin(new BarSkin(gauge));
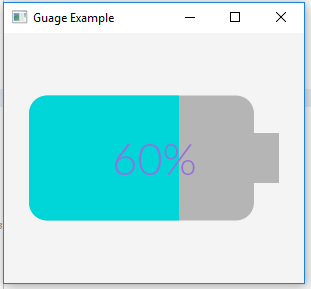
4) To use Battery Gauge skin
gauge.setSkin(new BatterySkin(gauge));
5) To use Bulletchart Gauge Skin
gauge.setSkin(new BulletChartSkin(gauge));
6) To use Simple Digital Skin
gauge.setSkin(new SimpleDigitalSkin(gauge));
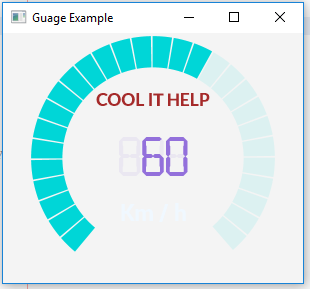
7) To use Section Skin
gauge.setSkin(new
SectionSkin(gauge));
SectionSkin(gauge));
You guys can explore more skin that is
present in package “eu.hansolo.medusa.skins” and choose the best skin suits to your
project. If you have any doubt so please comment. We need your support to serve
you a better way.
present in package “eu.hansolo.medusa.skins” and choose the best skin suits to your
project. If you have any doubt so please comment. We need your support to serve
you a better way.
Thanks
for reading.
for reading.
Thank you very much! It's very useful